
DIY Home Repair Tips for New Jacksonville Beach Homeowners

Congratulations on your new Jacksonville Beach home. Living steps from the ocean is a dream, but home care in a coastal climate is different from inland upkeep. Higher humidity, salt-laden air, strong sun, and seasonal storms all accelerate wear and tear on exteriors, windows, drywall, caulk lines, and hardware. The good news: with a smart toolkit, a seasonal maintenance mindset, and a few reliable techniques, you can handle many common fixes confidently and safely.
This comprehensive guide is built for first-time coastal homeowners ready to take care of small repairs while knowing when to bring in a nearby pro. You’ll learn where to prioritize time and budget, what materials hold up best near the ocean, and how to spot issues before they become expensive. And if you need expert backup in Ponte Vedra Handyman or Jacksonville Beach, keep a trusted neighborly resource like Jax Beach Handyman on speed dial.
Why Home Repairs Differ in Coastal Regions
Ocean air is hard on houses. Salt accelerates corrosion on fasteners, hinges, locks, and outdoor fixtures. UV exposure bakes paint and sealants. Humidity drives mold growth and makes wood swell and contract, stressing finishes and caulk lines. Periodic high winds and driving rain test your exterior envelope, finding the tiniest gaps in flashing, trim, and weatherstripping. These factors don’t mean constant repairs—but they do reward regular inspection and thoughtful materials.
Top four coastal stressors
- Salt: Corrodes metals and eats finishes, especially on coastal-facing sides.
- Humidity: Encourages mold, mildew, and swollen wood; breaks down indoor paint and caulk.
- UV and Heat: Fades paint, dries and cracks caulk, destabilizes plastics and sealants.
- Wind and Storms: Drive water under siding, through window gaskets, and around roof penetrations.
Graph: Common Coastal Home Issues Over Time
Use this simple trend visualization to understand when different issues tend to spike across the year in Northeast Florida. Consider checking the highlighted areas during your monthly walk-throughs.
Legend:  ▄ low  ▆ medium  █ high   (JFMAMJ JASOND = months)

Corrosion on exterior hardware:    J F M A M J  J A S O N D
                                   ▄ ▄ ▆ █ █ █  █ █ █ ▆ ▆ ▄

Caulk failure around windows:      J F M A M J  J A S O N D
                                   ▄ ▄ ▆ ▆ █ █  █ █ ▆ ▆ ▄ ▄

Mold/mildew in baths/closets:      J F M A M J  J A S O N D
                                   ▆ █ █ █ █ █  █ █ █ █ ▆ ▆

Paint fading/chalking (exterior):  J F M A M J  J A S O N D
                                   ▄ ▆ █ █ █ █  █ █ █ ▆ ▄ ▄
Top DIY Repairs New Coastal Homeowners Should Know
Mastering a few skillful, repeatable tasks will save you money and extend the life of your finishes. Prioritize these three: replacing caulk, patching drywall, and performing paint touch-ups with coastal-friendly products.
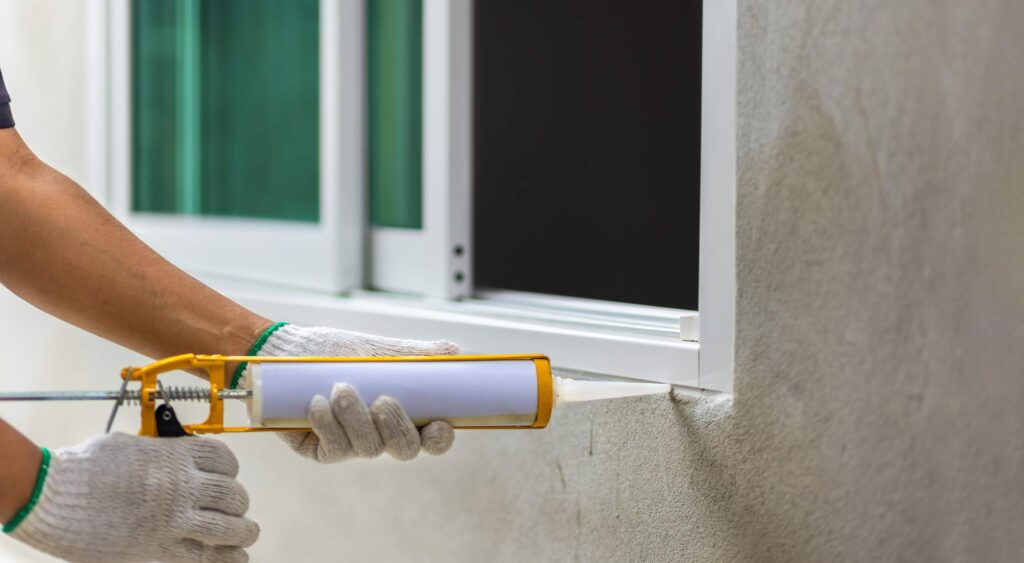
1) Caulking replacement
Coastal homes depend on tight seals. Inspect interior wet areas (tubs, showers, backsplashes) and exterior joints (window trim, door casings, siding seams). Look for cracking, separated edges, mildew blackening, or brittle sections. Remove failed caulk with a plastic scraper and caulk remover gel, clean with isopropyl alcohol, dry thoroughly, then recaulk.
Pro tip: On exterior joints and areas with movement, choose a high-performance elastomeric or polyurethane sealant. For baths and kitchens, use a premium 100% silicone with mold-inhibiting additives.
2) Drywall patching
Humidity and shifting can cause nail pops, hairline cracks, and dings. Most small repairs are approachable with lightweight spackle or setting compound. For larger holes (e.g., from door handles), use a patch kit with a self-adhesive mesh and an all-purpose joint compound, then sand and prime.
Pro tip: Always prime patched areas before painting; coastal humidity will telegraph unprimed patches through topcoats.
3) Paint touch-ups
Exterior paint is your home’s armor against UV and moisture. Indoors, satin or semi-gloss in kitchens and baths resists humidity and is easier to clean. Keep labeled touch-up jars for each room. For exterior trim and siding, choose UV-resistant, mildew-resistant paints with high solids and 100% acrylic binders.
Table: Materials That Perform in Coastal Conditions
| Repair Type | Best-in-Class Materials | Pros | Trade-Offs | DIY Cost Range |
|---|---|---|---|---|
| Exterior Caulking | Polyurethane or elastomeric sealant | Highly flexible; long lifespan; strong adhesion | Longer cure time; more difficult cleanup | $8–$15/tube |
| Bath/Kitchen Caulking | 100% silicone with mildew-resistant additive | Waterproof; resists mold; durable in humidity | Cannot be painted; strong odor during cure | $7–$12/tube |
| Drywall Patching (small) | Lightweight spackle + stain-blocking primer | Fast dry; easy sanding; minimal shrink | Not for large holes; may need multiple coats | $10–$20 total |
| Drywall Patching (medium) | Self-adhesive mesh + all-purpose joint compound | Strong patch; blends well; paintable | Requires sanding/priming; dust control needed | $15–$35 |
| Interior Paint (coastal) | 100% acrylic, mildew-resistant satin/semi-gloss | Washable; resists humidity; smooth finish | Shows surface prep flaws if rushed | $35–$70/gallon |
| Exterior Paint (coastal) | High-solids, UV-resistant 100% acrylic | Better color retention; resists chalking | Higher cost; meticulous prep required | $45–$90/gallon |
| Hardware/fasteners | 316 stainless steel or hot-dip galvanized | Superior corrosion resistance | More expensive | +20–50% vs. standard |
What Tools Every Homeowner Should Keep On Hand

Think of your toolkit as your home’s first-aid kit. With these items, most quick fixes become simple weekend wins.
Core tools
- Quality 16–20 oz hammer and a set of screwdrivers (Phillips, flat, square)
- Impact driver or drill with stainless or coated bits; extra driver bits
- Utility knife with spare blades; painter’s tool (5-in-1)
- Stud finder; magnetic nail finder for trim
- Level (24″) and torpedo level; measuring tape (25′)
- Oscillating multi-tool for trim, caulk removal, and precise cuts
- Shop vacuum with HEPA filter for dust control
- Caulk gun (dripless) and finishing tools; blue tape
- Putty knives (1.5″ and 6″) and sanding block (plus 120/220 grit paper)
- LED work light and headlamp
Consumables and coastal-specific supplies
- Elastomeric/polyurethane exterior sealant; 100% silicone for wet areas
- Stain-blocking primer; interior/exterior acrylic paint
- Spackle and joint compound; self-adhesive mesh patches
- Stainless steel deck screws and exterior-rated fasteners
- Mildew cleaner and isopropyl alcohol for surface prep
- Weatherstripping foam, door sweeps, and window glazing points
Infographic: Coastal DIY Toolkit at a Glance
[Coastal DIY Toolkit]
- Inspect: Headlamp, moisture meter, level, tape
- Seal: Caulk gun + elastomeric/silicone, scraper, alcohol wipes
- Patch: Mesh patches, spackle, 6" knife, sanding block, primer
- Paint: Angled brush, microfiber roller, tray liners, drop cloths
- Secure: 316 SS screws, impact driver, spare bits, anchors
- Protect: N95 mask, safety glasses, gloves, hearing protection
Warning Signs You Shouldn’t Ignore
Coastal problems start small. Catching them early keeps fixes inexpensive and DIY-friendly.
Moisture and water damage
- Yellow/brown ceiling or wall stains after heavy rain
- Bubbling paint or soft drywall around windows/doors
- Persistent mildew odor in closets or baths
If you see bubbling paint, carefully score and remove loose material, dry the area thoroughly, treat with a mold-inhibiting cleaner, and prime with a stain-blocking primer. Persistent staining or multiple areas may signal flashing or roof issues—plan for a professional inspection.
Drafty windows and doors
- Visible daylight around door edges
- Rattling windows during wind
- Condensation between double panes
DIY fixes include replacing weatherstripping, adjusting strike plates, and adding door sweeps. Condensation inside double-pane glass indicates failed seals; that’s a professional repair or replacement scenario.
Warped siding, trim, or interior walls
- Trim pulling away from siding
- Wavy drywall seams or widening cracks
- Soft, punky wood on sills or fascia
Small gaps in trim are routine and solvable with elastomeric caulk after you refasten boards with corrosion-resistant fasteners. Soft wood means rot—probe gently with an awl. If the damage extends beyond the surface or is near structural areas, call a pro.
Quick visual checklist
- Monthly: Walk the exterior; note any cracked caulk, exposed fasteners, or rust streaks.
- Quarterly: Inspect bath/shower caulk, kitchen backsplashes, laundry area valves/hoses.
- After storms: Check around window heads, door thresholds, soffits, and attic for moisture.
When to Call a Professional: ponte vedra handyman vs. DIY
DIY shines on small, isolated issues with clear causes. In coastal homes, however, water has a way of traveling—what looks simple can reveal a bigger story. Calling in a pro early can prevent expensive escalation.
Call a pro immediately for:
- Active leaks, ceiling drips, or staining that worsens after rain
- Electrical issues: tripping breakers, warm outlets, or corroded service components
- Rot in structural members, sill plates, or roof sheathing
- Window/door replacements, or persistent fogging between panes
- Mold covering more than 10 square feet or returning after cleaning
DIY with caution (and a backup plan):
- Replacing failed caulk lines around doors and windows—if wood beneath is solid
- Repairing small drywall dings and cracks—not widespread wavy seams
- Exterior touch-up painting on well-prepped, sound surfaces
Tip: If an issue recurs after a careful DIY repair, schedule a consult with a ponte vedra handyman to assess underlying causes (flashing, ventilation, or material compatibility).
How a ponte vedra handyman Can Support Your DIY Journey
Think of pros as collaborators, not competitors. The right partner can help you plan, verify, and finish projects faster and safer. A local expert who understands Jacksonville Beach and Ponte Vedra microclimates can spot patterns that general guides miss—like the way afternoon sea breezes drive rain at specific elevations, or which side of your home gets the worst UV exposure.
Smart collaboration models
- Scope-and-setup: A pro assesses, advises on materials, and leaves you a step-by-step plan.
- DIY + pro finish: You handle prep; the pro tackles critical sealing, flashing, or finishing.
- Annual tune-ups: A once-a-year inspection catches issues early and prioritizes your DIY list.
Examples
- Windows: You remove old caulk and clean; the pro applies elastomeric sealant where movement is likely and verifies flashing integrity.
- Drywall: You patch small dents; the pro addresses recurring corner cracks with proper taping and reinforcement.
- Exterior paint: You scrape and prime; the pro sprays/rolls high-exposure elevations and fine-tunes trim.
Related Homecare Resources
Continue your coastal DIY education with these focused how-tos:
- Jacksonville Beach Coastal Painting & Caulking Guide — Learn the prep, products, and techniques that last near the ocean.
- Jacksonville Handyman Guide: Drywall Repair for Beach Homes — Step-by-step patches that hold up in humidity.
Step-by-Step Mini-Guides
Resealing an Exterior Window (Weekend Project)
- Inspect: Identify cracks or failed caulk at vertical joints and horizontal heads.
- Remove: Cut out old caulk with a sharp utility knife and plastic scraper; use caulk remover if brittle.
- Clean: Vacuum debris; wipe surfaces with isopropyl alcohol; let dry completely.
- Mask: Tape edges for crisp lines; plan continuous beads to avoid stops/starts.
- Apply: Gun a steady bead of elastomeric or polyurethane sealant; tool with a caulk spoon at 45°.
- Cure: Respect cure times (often 24–48 hours before painting).
- Paint: If paintable, apply UV-resistant exterior acrylic after full cure.
Fixing a Small Drywall Ding
- Prep: Lightly sand; remove dust.
- Fill: Apply lightweight spackle with a 1.5″ knife; feather edges.
- Sand: Once dry, sand flush; repeat thin coats if needed.
- Prime: Spot-prime with stain-blocking primer.
- Paint: Touch up with the original paint; blend into edges with a microfiber roller.
Moisture Prevention Infographic and Checklist
[Coastal Moisture Guard]
- Vent: Run bath fans 20 min post-shower; use range hood while cooking
- Seal: Inspect caulk at tub, sinks, and windows quarterly
- Flow: Keep gutters clear; confirm downspouts discharge away from foundation
- Breathe: Use a dehumidifier in closed rooms/closets during peak humidity
- Protect: Add door sweeps and weatherstripping to minimize wind-driven rain
- Verify: Check under sinks and around toilets for slow leaks monthly
Maintenance Calendar: What to Do and When
Monthly
- Walk the perimeter: look for chipped paint, cracked caulk, and rust stains.
- Operate windows/doors: listen for grinding or sticking; lubricate moving parts with silicone spray (not oil) and choose corrosion-resistant hardware.
- Check under sinks and around water heaters for drips or rust.
Quarterly
- Deep clean and recaulk as needed in baths and kitchens.
- Vacuum HVAC return grills; replace filters (more often in peak season).
- Inspect attic after major rains for damp insulation or stained decking.
Annually
- Pressure wash carefully (low pressure on painted wood and stucco) to remove salt film.
- Repaint high-exposure trim as needed; touch up sun-facing elevations.
- Schedule a roof/flashings check—especially after an active storm season.
FAQs for First-Time Coastal Homeowners
How often should I replace exterior caulk near the beach?
Inspect quarterly and expect rework every 2–4 years on high-exposure sides, sooner if you see cracks or separation. Premium elastomeric or polyurethane extends lifespan.
Is it okay to use interior “bath” paint in other rooms?
Yes. Mildew-resistant acrylic paints in satin or semi-gloss perform well in laundry rooms and kitchens, and can be used in high-traffic living areas where washability is a priority.
What’s the best fastener type outside?
For Jacksonville Beach and Ponte Vedra, use 316 stainless steel for maximum corrosion resistance. Hot-dip galvanized is acceptable for many applications but may show surface corrosion sooner.
Do I need primer on every patch?
Yes. Even small spackle spots benefit from a stain-blocking primer for uniform sheen and adhesion—especially in humid environments where flashing can show through topcoats.
How do I know if a wall stain is old or active?
Mark the edge with pencil and date it. If the stain expands after rain or feels cool/damp, it’s active—call a pro to trace the leak path.
Long-Term Benefits of DIY With Backup
Selective DIY isn’t just about saving money. It’s about controlling timelines, building confidence, and learning the rhythms of your coastal home. You’ll recognize normal seasonal changes versus red flags, and you’ll plan proactive maintenance instead of reacting to surprises.
- Cost control: Handle straightforward tasks yourself and reserve your budget for complex or structural work.
- Pride and resilience: Familiarity with your home makes storm prep and recovery much smoother.
- Better outcomes: A quick consult with a trusted pro can refine your materials list and prevent rework.
Further Reading For Coastal DIY Mastery
Dive deeper into two essential topics:
- Jacksonville Beach Coastal Painting & Caulking Guide for exterior longevity and tight seals.
- Jacksonville Handyman Guide: Drywall Repair for Beach Homes for pristine walls that stand up to humidity.
Conclusion
New Jacksonville Beach homeowners thrive when they combine smart DIY with strategic professional help. Prioritize sealing and moisture control, keep a versatile toolkit, and inspect regularly. When the scope widens—especially with water intrusion, structural concerns, or recurring issues—don’t hesitate to bring in a local expert. If you’re near Ponte Vedra or anywhere along the Beaches, consult Jax Beach Handyman to assess tricky problems, set up a maintenance plan, or partner on projects. Schedule a quick inspection or project walkthrough to get peace of mind and keep your coastal home in top shape year-round.
https://shorturl.fm/28Cs7
https://shorturl.fm/qmLNX
https://shorturl.fm/crWgQ
https://shorturl.fm/uJlvN
Sbet77 is my go-to! Always a fun time playing there. The interface is clean and the customer service is responsive. If you’re looking for a reliable platform, I recommend giving sbet77 a try, bro! sbet77
Heard about 555gameonline, decided to check it out. Initial impressions are good. Worth a peek to form your own opinion! Check it out: 555gameonline
Alright, gonna test my luck with qtgameapk. The design is pretty neat. Check it out: qtgameapk